 IDE TEA
Working with agents, step by step
Your coding agent keeps running in a terminal. IDE TEA gives it a way to ask you things properly, and makes sure nothing runs without your say.
1. Before you start
- A coding agent that reads
AGENTS.mdorCLAUDE.md: Claude Code, Codex, and others. ideteaon yourPATH(the installer does it). Agents use theideteacommands when they find them, and fall back to writing the files themselves.- A project open in IDE TEA.
2. Teach the project's agents
- Open the command palette (Ctrl+Shift+P).
- Run Interfaces: teach this project's agents.
- The IDE writes a short block of instructions into the
AGENTS.mdandCLAUDE.mdyou already have, leaving the rest of each file alone. With neither, it creates anAGENTS.mdand aCLAUDE.mdthat imports it. Commit them with the project, or keep them to yourself: your choice.
3. Run your agent inside the IDE
Open the terminal (Ctrl+Shift+T) and start your agent there, as you would anywhere else:
claude # or codex, or your agent of choiceAsk for what you want as usual. When the agent needs a decision, it uses the panel instead of the chat. You can also say it outright: "ask me in the IDE panel".
4. Answer a question
When the agent asks something, the Interfaces panel opens with a real form, and the status bar says a new question arrived.
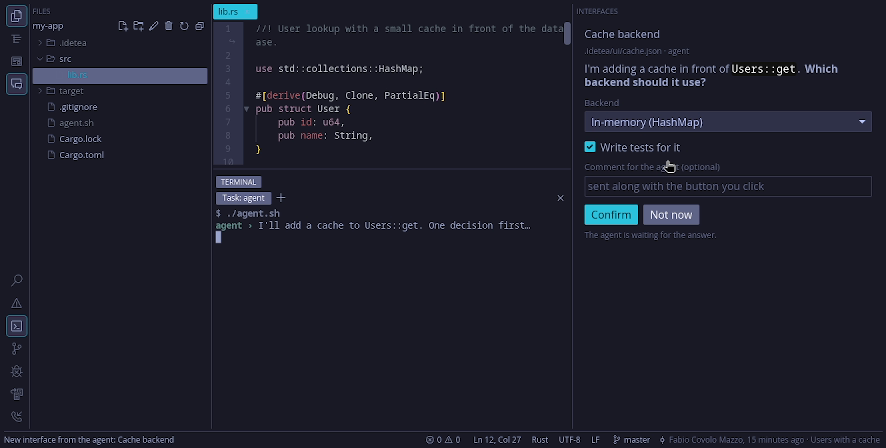
- Fill in the form: choices, checkboxes, text fields. A button that needs something first says what is missing.
- Optional: write a comment for the agent (a caveat, a question back). It goes with the button you click.
- Click a button. The answer goes back to the agent, which carries on.
Every question and your answer are kept. Open Interfaces history (palette, or the History link at the top of the panel) to see the open questions first and the answered ones by day, with search. An entry opens read-only, as you answered it, with when the agent read it.
Agents can also show you images, galleries to pick from, animated sprites, sounds with their waveform, files to edit (a commit message, a PR description), and step lists for a manual test, with an approve button that waits until you have done the steps. Select text, at the top of an interface, lets you copy its text.
5. Approve a terminal
To run something you should be able to watch (tests, a dev server, another agent), the agent asks the IDE for a terminal. A Terminal request tab shows exactly what would run, and where.
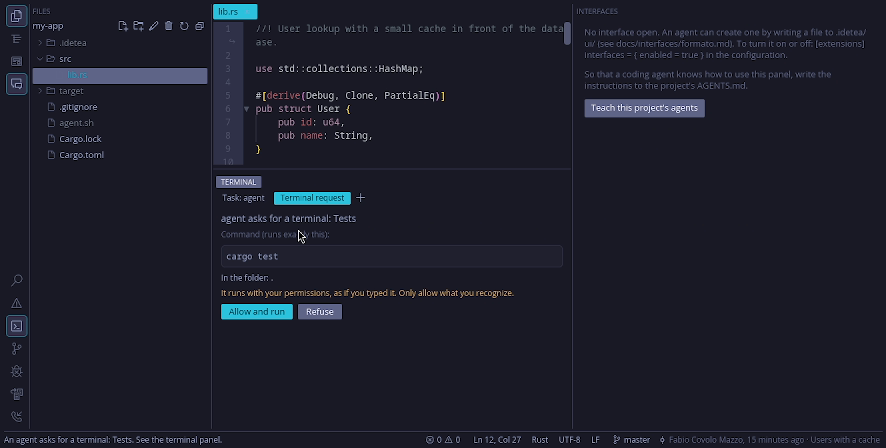
- Read the command. It runs exactly that, with your permissions, as if you typed it.
- Click Allow and run, or Refuse. The agent learns which one you chose.
- The command runs in its own tab. When it ends, the tab keeps the output and the exit code until you press Enter; the agent gets the code (and, if the command wrote one, an answer file).
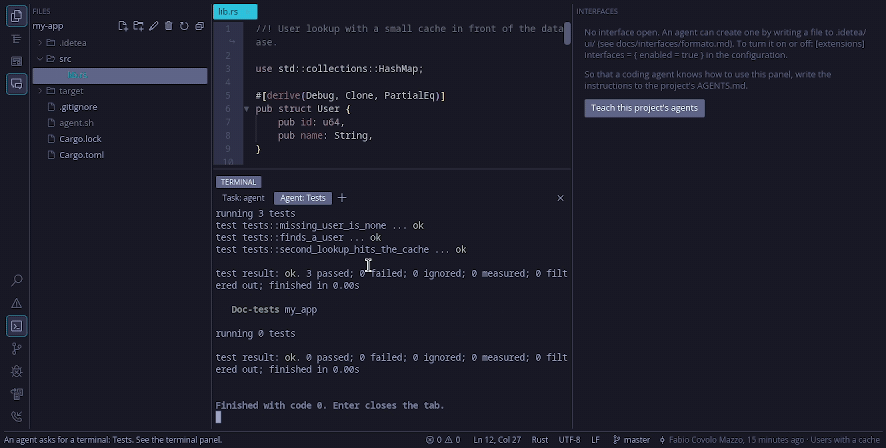
Closing the tab before the end stops the command, and the agent is told.
6. Skip the question for commands you trust
Put them in your config, ~/.config/idetea/config.toml:
[agents]
allow = ["npm run dev", "cargo test", "claude *"]
An entry is the exact command, or a start followed by *: that start plus plain arguments, with no
; & | $, backticks or redirections.
.idetea/config.toml
it is ignored (with a warning): an agent can write project files, and a project must never be able to give itself
permission.7. Hand work to a helper agent
Your agent can start another one, for a review or a fix on the side, in its own git worktree, so the two never edit the same files:
idetea run --title "Reviewer" --worktree agent/review -- \
claude -p 'Review the last commit. Write your findings to the file in $IDETEA_ANSWER.'- You approve the request, as in step 5. The tab shows the branch it will use.
- The IDE creates
.idetea/worktrees/<name>on that branch and runs the helper there. - The helper writes its answer to
$IDETEA_ANSWER; your main agent reads it and brings code in from the branch the usual way (with your test and approval). - When it is done, the worktree is removed if it has nothing uncommitted. The branch always stays.
8. The idetea commands
Agents use these when idetea is on the PATH. Each does the whole round trip in one call.
You can try them yourself in the IDE terminal.
| Command | What it does |
|---|---|
idetea ask --text "Deploy now?" --confirm |
Shows a question in the panel and waits (10 minutes by default). Short forms: --options "a|b|c",
--confirm, --input "Name"; or a full form from a JSON file. Prints the answer. |
idetea run --title "Tests" -- cargo test |
Asks for a terminal, waits for the end, prints the helper's answer and exits with the command's code (5 if you refused). |
idetea status |
What you have open: the active file with the cursor, the open files, and which have unsaved changes
(--json too). |
idetea open src/main.rs:42 |
Shows you a file in the IDE, at that line, without asking anything. |
idetea history |
What you answered in the panel, oldest first (--name, --since,
--last N, --all, --json). Handy for an agent that lost its context. |
Run any of them alone to see all the options.
9. Start a new project with an agent
Project: new… in the palette (or idetea new) creates the folder, runs
git init, installs the agent skills of a template (empty, Rust, website, Python, FastAPI), writes
an initial request into AGENTS.md, and can open your agent in an IDE terminal for you to approve:
idetea new my-app --modelo rust --descricao "a unit converter" --agente claude10. Under the hood
Everything is plain files in the project's .idetea/ folder. These ones stay out of git:
.idetea/ui/<name>.json: a question; your answer lands in.idetea/ui/responses/..idetea/agents/<name>.json: a terminal request; its progress in<name>.status.json..idetea/state.json: what you have open, foridetea status..idetea/history/: every question and answer, until you clear it.
So any agent that can read and write files can use it, and you can read every message yourself. The full formats (in Portuguese for now): the Interfaces format and agent terminals.